Backstory
After poking around entire internet for a month, I finally managed to learn how Qemu works in general. There already lots of tutorial out there on how to setup ARM and MIPS based machines inside Qemu but I personally feel those are incomplete guides and does not touch the subject deeply. So that’s exact reason for wirting this article giving clear explanation about everything you will need to know inorder to have ARM and MIPS based Qemu virtual machine with full NAT networking support. This tutorial is combination of all other tutorial and documentation that I read to achieve this kind of straight forward setup.
Introduction
QEMU is a open source virtual machine software it emulates the machine’s processor through dynamic binary translation and provides a set of different hardware and device models for the machine, enabling it to run a variety of guest operating systems.
Before continuing this tutorial you will need to install certain packages in your system. I am targeting kali linux users for this tutorial since it’s major choice among cyber security folks. It is also a debian based distro so it should also work on other debian based distro as well for example Ubuntu and Parrot OS. See the table below to know the usage of each package.
| Package | Description |
|---|---|
| qemu | Base package |
| qemu-system | System emulation |
| libguestfs-tools | To work with guest/VM’s filesystem |
| bridge-utils | For bridge management of guest iface |
| dnsmasq | DHCP server for our NAT network |
| virt-manager | GUI Qemu manager and display window |
Install commmand for Kali/Debian:
apt update && apt install qemu qemu-system libguestfs-tools bridge-utils dnsmasq virt-manager -y
After installation to see list of supported emulation boards for your target architecture you can try following commands:
▶ qemu-system-arm -M help
Supported machines are:
akita                Sharp SL-C1000 (Akita) PDA (PXA270)
ast2500-evb          Aspeed AST2500 EVB (ARM1176)
borzoi               Sharp SL-C3100 (Borzoi) PDA (PXA270)
canon-a1100          Canon PowerShot A1100 IS
cheetah              Palm Tungsten|E aka. Cheetah PDA (OMAP310)
collie               Sharp SL-5500 (Collie) PDA (SA-1110)
...
▶ qemu-system-mipsel -M help
Supported machines are:
malta                MIPS Malta Core LV (default)
mips                 mips r4k platform
mipssim              MIPS MIPSsim platform
none                 empty machine
In this tutorial we will use ARM-virt and MIPS-malta board since both allows us to have more ram than 1GB.
Installation
First we need to get installation files online. We will need to of them, base kernel and initram disk which holds our actual installer.
ARM
#Base kernel
wget http://http.us.debian.org/debian/dists/buster/main/installer-armhf/current/images/netboot/vmlinuz

#Initramfs
wget http://http.us.debian.org/debian/dists/buster/main/installer-armhf/current/images/netboot/initrd.gz
MIPSEL
wget http://debian.osuosl.org/debian/dists/buster/main/installer-mipsel/current/images/malta/netboot/vmlinux-4.19.0-6-4kc-malta

wget http://debian.osuosl.org/debian/dists/buster/main/installer-mipsel/current/images/malta/netboot/initrd.gz
As time of writing this article buster is latest debian distro which will reach end of life by 2022 check out more here.
Now we need to create virtual hard drive for Qemu in qcow2 file format(Qemu copy on write). Because it allows us to create snapshot qemu-img create -f qcow2 -b … command.
qemu-img create -f qcow2 hda.qcow2 20G
Above command will create empty qcow2 disk with max storage upto 20GB
Now time to boot our installer from command line window.
ARM
qemu-system-arm -M virt -m 2048 -smp 2 \
-kernel vmlinuz -initrd initrd.gz \
-drive if=none,file=hda.qcow2,id=hd0 \
-device virtio-blk-device,drive=hd0 \
-netdev user,id=net0 \
-device virtio-net-device,netdev=net0 \
-nographic -no-reboot
MIPSEL
qemu-system-mipsel -M mips -m 2048
-kernel vmlinux-4.19.0-6-4kc-malta -initrd initrd.gz \
-hda hda.qcow2 -append "root=/dev/ram console=ttyS0" \
-nic user \
-nographic -no-reboot
-m option is to set RAM in MB and with -smp we dedicate number of host CPU cores to VM (malta only supports 1), -nogprahic output everything in terminal and -no-reboot prevents reboot after installation shutdown. After sucessful boot you will be presented with setup screen below. Just go through all setup prompt as usual. We are gonna use default SLIRP user networking backend for our guest machines during installation. In upcoming steps we will see how to setup NAT network which will allow communication between guest<->host and guest<->guest. Please note that it will take more than hour in setup depending on your host system specs.
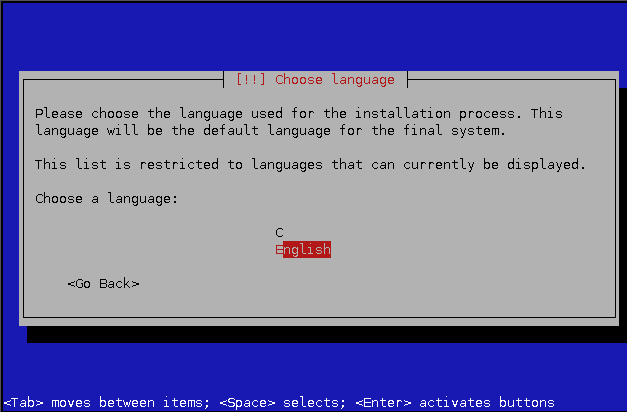
Installation prompt after sucessful boot
once setup is complete it will give you warning like this.
ARM
+-----------------| [!] Continue without boot loader |------------------+
|                                                                       |
|                       No boot loader installed                        |
| No boot loader has been installed, either because you chose not to or |
| because your specific architecture doesn't support a boot loader yet. |
|                                                                       |
| You will need to boot manually with the /vmlinuz kernel on partition  |
| /dev/vda1 and root=/dev/vda2 passed as a kernel argument.             |
|                                                                       |
|                              <Continue>                               |
|                                                                       |
+-----------------------------------------------------------------------+
MIPSEL
+-----------------| [!] Continue without boot loader |------------------+
|                                                                       |
|                       No boot loader installed                        |
| No boot loader has been installed, either because you chose not to or |
| because your specific architecture doesn't support a boot loader yet. |
|                                                                       |
| You will need to boot manually with the kernel on partition           |
| /dev/sda1 and root=/dev/sda1 passed as a kernel argument.             |
|                                                                       |
|                              <Continue>                               |
|                                                                       |
+-----------------------------------------------------------------------+
Warning message is pretty straight forward after installation we have to append correct kernel argument value for root partition with -append=“root=[whatever_indicated_in_warning]”. before that we need to extract installed kernel and initram disk from qcow2 disk image into current directory. Here we will take advantages of utilities provided by libguestfs-tools package.
First we will use virt-ls command to list all files inside /boot from rootfs and then copy our required files with help of virt-copy-out command.
ARM
▶ virt-ls -a hda.qcow2 /boot
System.map-4.19.0-6-armmp-lpae
config-4.19.0-6-armmp-lpae
initrd.img
initrd.img-4.19.0-6-armmp-lpae
lost+found
vmlinuz
vmlinuz-4.19.0-6-armmp-lpae
virt-copy-out -a hda.qcow2 /boot/vmlinuz-4.19.0-6-armmp-lpae /boot/initrd.img-4.19.0-6-armmp-lpae .
MIPSEL
▶ virt-ls -a hda.qcow2 /boot
System.map-4.19.0-6-4kc-malta
config-4.19.0-6-4kc-malta
initrd.img-4.19.0-6-4kc-malta
vmlinux-4.19.0-6-4kc-malta
virt-copy-out -a hda.qcow2 /boot/vmlinux-4.19.0-6-4kc-malta /boot/initrd.img-4.19.0-6-4kc-malta .
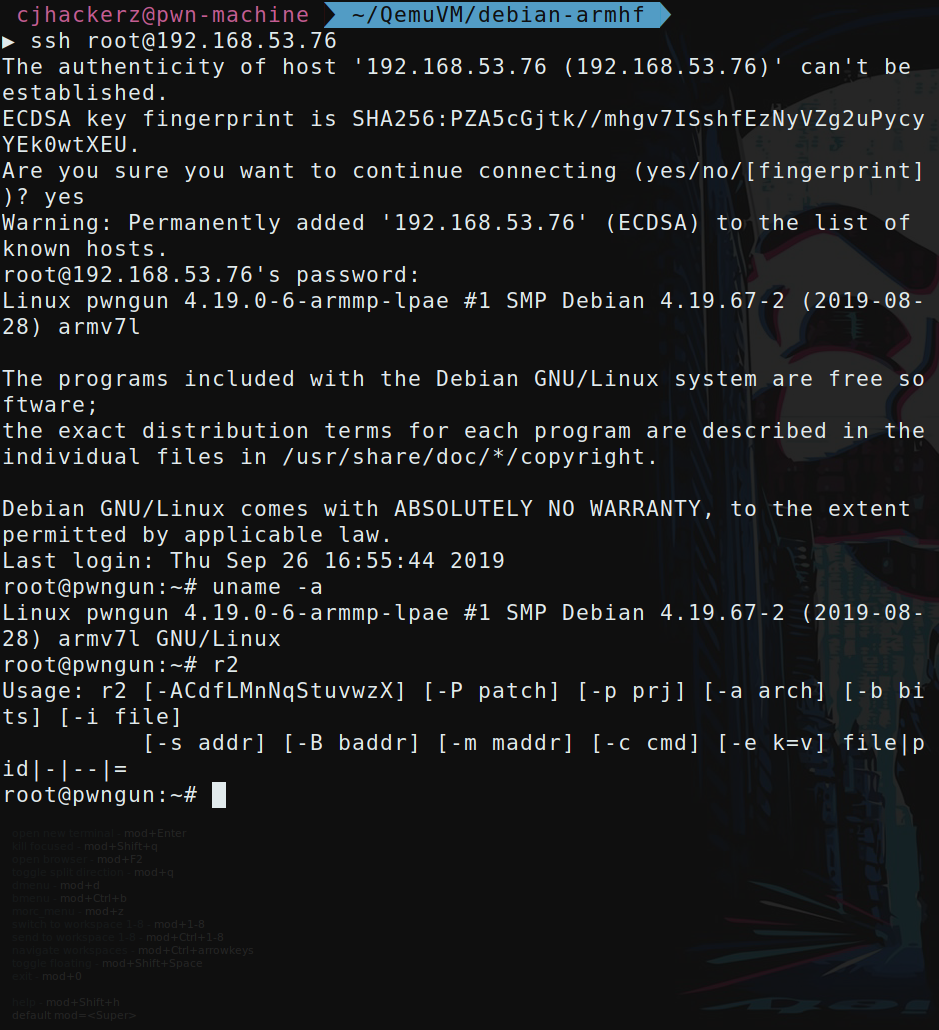
Now tweak your previously entered commands according to your target arch and boot into vm. Notice we removed -nographic option since now this time we can use our GUI window provided by virt-manager. To access console you have to switch to serial0 from view menu or by pressing Ctrl+Alt+2 key. If everything goes well you will be greeted by login screen asking for username and password that you choose during os installation.
ARM
qemu-system-arm -M virt -m 2048 -smp 2 \
-kernel vmlinuz-4.19.0-6-armmp-lpae \
-initrd initrd.img-4.19.0-6-armmp-lpae \
-drive if=none,file=debian-armhf.qcow2,id=hd0 \
-append 'root=/dev/vda2' \
-device virtio-blk-device,drive=hd0 \
-netdev user,id=net0 -device virtio-net-device,netdev=net0 \
-no-reboot &
MIPSEL
qemu-system-mipsel -M malta -m 2048 \
-kernel vmlinux-4.19.0-6-4kc-malta -initrd initrd.img-4.19.0-6-4kc-malta \
-hda debian-mipsel.qcow2 -append "root=/dev/sda1 console=ttyS0" \
-nic user \
-no-reboot &
NAT networking setup
I know you can directly port forward from SLIRP netwroking backend but thing is when you are testing uknown application or planning to use other ports for your reverse shell you will obiviously desire network setup which will allow you to have access over all 65535 ports and interact with other VM in same network easily. And this setup is same as NAT network in VMWare. Qemu offers tap interface as solution for this scenario. The tap networking backend makes use of a tap networking device in the host. It offers very good performance and can be configured to create virtually any type of network topology (NAT in our case).
In tap networking when Qemu VM boots up it executes /etc/qemu-ifup bash script to manage tap interface and before exiting /etc/qemu-ifdown gets executed where we can place commands to discard all of our networking settings and bring everything to normal state in host machine. Both we have to create manually and don’t exists be default inorder to configure out NAT network topology.
Place following content inside /etc/qemu-ifup file.
#!/bin/sh
#
# Copyright IBM, Corp. 2010
#
# Authors:
#  Anthony Liguori <[email protected]>
#
# This work is licensed under the terms of the GNU GPL, version 2.  See
# the COPYING file in the top-level directory.

# Set to the name of your bridge
BRIDGE=br0

# Network information
NETWORK=192.168.53.0
NETMASK=255.255.255.0
GATEWAY=192.168.53.1
DHCPRANGE=192.168.53.2,192.168.53.254

# Optionally parameters to enable PXE support
TFTPROOT=
BOOTP=

do_brctl() {
    brctl "$@"
}

do_ifconfig() {
    ifconfig "$@"
}

do_dd() {
    dd "$@"
}

do_iptables_restore() {
    iptables-restore "$@"
}

do_dnsmasq() {
    dnsmasq "$@"
}

check_bridge() {
    if do_brctl show | grep "^$1" > /dev/null 2> /dev/null; then
	return 1
    else
	return 0
    fi
}

create_bridge() {
    do_brctl addbr "$1"
    do_brctl stp "$1" off
    do_brctl setfd "$1" 0
    do_ifconfig "$1" "$GATEWAY" netmask "$NETMASK" up
}

enable_ip_forward() {
    echo 1 | do_dd of=/proc/sys/net/ipv4/ip_forward > /dev/null
}

add_filter_rules() {
do_iptables_restore <<EOF
# Generated by iptables-save v1.3.6 on Fri Aug 24 15:20:25 2007
*nat
:PREROUTING ACCEPT [61:9671]
:POSTROUTING ACCEPT [121:7499]
:OUTPUT ACCEPT [132:8691]
-A POSTROUTING -s $NETWORK/$NETMASK -j MASQUERADE
COMMIT
# Completed on Fri Aug 24 15:20:25 2007
# Generated by iptables-save v1.3.6 on Fri Aug 24 15:20:25 2007
*filter
:INPUT ACCEPT [1453:976046]
:FORWARD ACCEPT [0:0]
:OUTPUT ACCEPT [1605:194911]
-A INPUT -i $BRIDGE -p tcp -m tcp --dport 67 -j ACCEPT
-A INPUT -i $BRIDGE -p udp -m udp --dport 67 -j ACCEPT
-A INPUT -i $BRIDGE -p tcp -m tcp --dport 53 -j ACCEPT
-A INPUT -i $BRIDGE -p udp -m udp --dport 53 -j ACCEPT
-A FORWARD -i $1 -o $1 -j ACCEPT
-A FORWARD -s $NETWORK/$NETMASK -i $BRIDGE -j ACCEPT
-A FORWARD -d $NETWORK/$NETMASK -o $BRIDGE -m state --state RELATED,ESTABLISHED -j ACCEPT
-A FORWARD -o $BRIDGE -j REJECT --reject-with icmp-port-unreachable
-A FORWARD -i $BRIDGE -j REJECT --reject-with icmp-port-unreachable
COMMIT
# Completed on Fri Aug 24 15:20:25 2007
EOF
}

start_dnsmasq() {
    do_dnsmasq \
	--strict-order \
	--except-interface=lo \
	--interface=$BRIDGE \
	--listen-address=$GATEWAY \
	--bind-interfaces \
	--dhcp-range=$DHCPRANGE \
	--conf-file="" \
	--pid-file=/var/run/qemu-dnsmasq-$BRIDGE.pid \
	--dhcp-leasefile=/var/run/qemu-dnsmasq-$BRIDGE.leases \
	--dhcp-no-override \
	${TFTPROOT:+"--enable-tftp"} \
	${TFTPROOT:+"--tftp-root=$TFTPROOT"} \
	${BOOTP:+"--dhcp-boot=$BOOTP"}
}

setup_bridge_nat() {
    if check_bridge "$1" ; then
	create_bridge "$1"
	enable_ip_forward
	add_filter_rules "$1"
	start_dnsmasq "$1"
    fi
}

setup_bridge_vlan() {
    if check_bridge "$1" ; then
	create_bridge "$1"
	start_dnsmasq "$1"
    fi
}

setup_bridge_nat "$BRIDGE"

if test "$1" ; then
    do_ifconfig "$1" 0.0.0.0 up
    do_brctl addif "$BRIDGE" "$1"
fi
And following lines for /etc/qemu-ifdown
#!/bin/bash

BRIDGE=br0

killall dnsmasq
brctl delif "$BRIDGE" "$1"
ip link set "$1" down
ip link set "$BRIDGE" down
ip tuntap del dev "$1" mode tap
brctl delbr "$BRIDGE"
iptables -F
Make both of them executable
chmod 700 /etc/qemu-ifup
chmod 700 /etc/qemu-ifdown
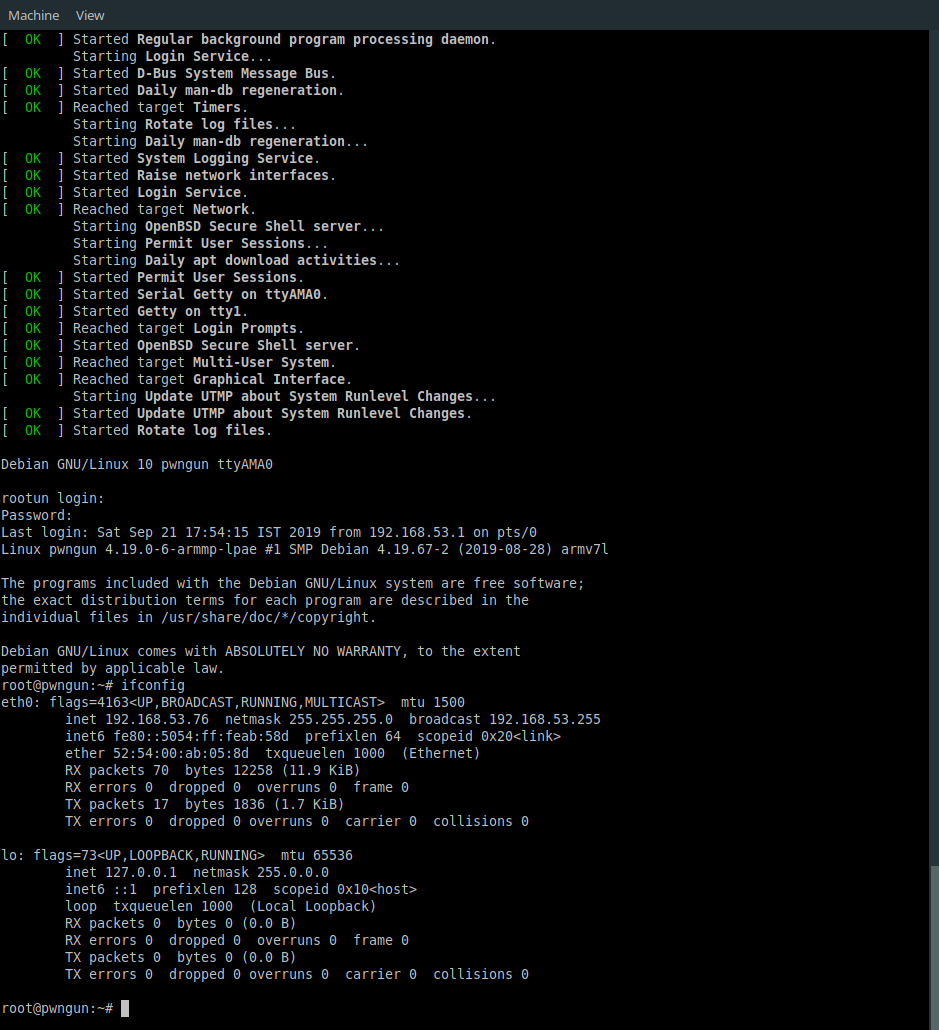
So qemu-ifup make use of dnsmasq, bridge-utils and iptables to bridge tap interface to br0 and forward all packets to internet facing devices with help of ip tables rules. Both script takes tap interface name as argument. For example if you are running one Qemu VM then it will be tap0 or if you are already running one new tap interface will created as tap1,tap2,tap3…tapN depending on number of VM you running simultaneously. You can check it with ifconfig command on host you will see br0 and tap0/tapN after VM boot up.
Time for the final boot up command tweaking
ARM
#!/bin/bash

qemu-system-arm -M virt -m 2048 -smp 2 \
-kernel vmlinuz-4.19.0-6-armmp-lpae \
-initrd initrd.img-4.19.0-6-armmp-lpae \
-drive if=none,file=debian-armhf.qcow2,id=hd0 \
-append 'root=/dev/vda2' \
-device virtio-blk-device,drive=hd0 \
-netdev tap,id=net0 -device virtio-net-device,netdev=net0,mac=52:54:00:AB:05:8D \
-object rng-random,filename=/dev/urandom,id=rng0 \
-device virtio-rng-device,rng=rng0 \
-no-reboot &
MIPSEL
#!/bin/bash

qemu-system-mipsel -M malta -m 2048 \
-kernel vmlinux-4.19.0-6-4kc-malta -initrd initrd.img-4.19.0-6-4kc-malta \
-hda debian-mipsel.qcow2 -append "root=/dev/sda1 console=ttyS0" \
-nic tap,mac=52:54:00:AB:21:D7 \
-no-reboot &
Notice that we add one more device for ARM VM. Basically we are binding /dev/urandom (host kernel entropy source) to VM because without it ssh service fails to start in VM boot up and takes around 15min time to come back online. I think armhf kernel for debian does not have proper support inbuilt entropy source for virt CPU which leads to this situation.
For both of the machine we change network backend from user to tap and provide unique mac address. To generate QEMU supported mac addresses use this command in terminal.
printf '52:54:00:AB:%02X:%02X\n' $((RANDOM%256)) $((RANDOM%256))
I prefer to save the boot commands into shell script file as boot-vm.sh where your VM files are located. Because I am not a super computer which remebers every single command in linux XD.
Post installation steps
So these installed VM are running bare minimum version of debian which lacks lot’s of utilities that we will need while conducting IoT security research work such as GDB and other development tools.
apt update && apt upgrade -y && apt install build-essential cmake git gdb python python-dev python-pip python3 python3-dev python3-pip net-tools
And then I start installing my other favourite tools such as radare2 :D
git clone https://github.com/radareorg/radare2.git && cd radare2
sys/install.sh
Installation prompt after sucessful boot
Software compilation is very slow in these emulated environments some times it takes hours to compile an open source software.
Important note: current qemu-ifdown script deletes networking bridge if you are running other qemu VM on tap backend using qemu-ifup script then communication with that VM will be disrupted. To restore networking just call script with tap interface name. For example you are running ARM machine (booted first) with MIPSEL (booted after ARM) one. And you shutdown MIPSEL you have to call script as following /etc/qemu-ifdown tap0 and then /etc/qemu-ifup tap0 to restore all networking state with ARM machine running on tap0 interface. Once I will get time, I will improve /etc/qemu-ifdown script with checks for other tap interface so it avoid deleting bridge interface if present any.
The End
Thanks you for taking your time and going through this detailed tutorial. If you like it don’t forget to share on any social media you like, it does really helps this blog. Don’t forget to check contact section of this blog to reach me out over social media for any queries.
Credits
[1]:> https://translatedcode.wordpress.com/2016/11/03/installing-debian-on-qemus-32-bit-arm-virt-board/
[2]:> https://www.aurel32.net/info/debian_mips_qemu.php